简介
Vue (读音 /vjuː/,类似于 view) 是一套用于构建用户界面的渐进式框架。与其它大型框架不同的是,Vue 被设计为可以自底向上逐层应用。Vue 的核心库只关注视图层,不仅易于上手,还便于与第三方库或既有项目整合。另一方面,当与现代化的工具链以及各种支持类库结合使用时,Vue 也完全能够为复杂的单页应用提供驱动。
HelloWorld
数据绑定最常见的形式就是使用 {{值}}(双大括号)的文本插值:
1
2
3
4
5
6
7
8
9
10
11
12
| <body>
<div id="app"><h1>{{msg}}</h1></div>
<script>
const vm = new Vue({
el:"#app",
data:{
msg:"hello "
}
})
</script>
</body>
|
内置指令
v-bind
单向数据绑定 简写 :xxx
示例:
1
2
3
4
5
6
7
8
9
10
11
12
13
14
15
16
17
18
19
20
21
22
23
24
25
26
27
28
29
30
| <div :class="color"></div>
完整示例
<head>
<style type="text/css">
.red_bg{
background-color: red;
}
.green_bg{
background-color: green;
}
</style>
</head>
<body>
<div id="app">
<div class="{{class_name}}">点击按钮改变背景样式:{{class_name}}</div>
<div v-bind:class="class_name">点击按钮改变背景样式:{{class_name}}</div>
<div :class="class_name">点击按钮改变背景样式:{{class_name}}</div>
<button @click="class_name='red_bg'">红色</button>
<button @click="class_name='green_bg'">绿色</button>
</div>
<script>
const vm = new Vue({
el:"#app",
data:{
class_name:""
}
})
</script>
</body>
|
v-model
双向数据绑定
1
2
3
4
5
6
7
8
9
10
11
12
13
14
15
16
17
18
19
20
21
22
| <div id="app">
<input type="text" :value="name"> <br>
<button @click="setName">点我设置value</button>
<button @click="getName">点我获取value</button>
</div>
<script>
const vm = new Vue({
el:"#app",
data:{
name:""
},
methods:{
setName(){
this.name="xiaohei";
},
getName(){
alert(this.name);
}
}
})
</script>
|
v-for
Vue中通过v-for指令来遍历
遍历数组
语法:
1
| v-for="(item,index) in items"
|
items:要遍历的数组,需要在vue的data中定义好。item:数组元素- index:元素下标,可以省略
示例:
1
2
3
4
5
6
7
8
9
10
11
12
13
| <div id="app">
<ul>
<li v-for="(item,index) in favorites">{{index+ ":"+item}}</li>
</ul>
</div>
<script>
var vm = new Vue({
el:"#app",
data:{
favorites:['唱','跳','Rap','打篮球']
}
});
</script>
|
再看一个对象数组的示例:
1
2
3
4
5
6
7
8
9
10
11
12
13
14
15
16
17
18
19
20
21
22
23
24
25
26
27
28
29
30
31
32
33
34
35
| <div id="app">
<table>
<thead>
<tr>
<th>name</th>
<th>age</th>
<th>gender</th>
</tr>
</thead>
<tbody>
<tr v-for="u in users">
<td>{{u.name}}</td>
<td>{{u.age}}</td>
<td>{{u.gender}}</td>
</tr>
</tbody>
</table>
<button onclick="addPerson()">点我</button>
</div>
<script>
const vm = new Vue({
el:"#app",
data:{
users: [
{"name": "小明", "age": 13, "gender": "男"},
{"name": "小红", "age": 13, "gender": "女"},
{"name": "小绿", "age": 4, "gender": "男"}
]
}
});
function addPerson(){
vm.users.push({"name": "小翠", "age": 14, "gender": "女"})
}
</script>
|
遍历对象
v-for除了可以迭代数组,也可以迭代对象。语法基本类似
语法:
1
2
3
| v-for="value in object"
v-for="(value,name) in object"
v-for="(value,name,index) in object"
|
- 1个参数时,得到的是对象的属性值
- 2个参数时,第一个是属性值,第二个是属性名
- 3个参数时,第三个是索引,从0开始
示例:
1
2
3
4
5
6
7
8
9
10
11
12
13
14
15
16
17
18
19
20
21
22
23
24
25
26
27
28
| <div id="app">
<ul>
<li v-for="(value,name,index) in person">{{index}} - {{name}}={{value}}</li>
</ul>
<button onclick="changePerson()">点我</button>
</div>
<script>
const vm = new Vue({
el:"#app",
data:{
person:{
"name": "zhangsan",
"age": 13,
"gender": "男",
"address": "中国"
}
}
})
function changePerson(){
vm.person = {
"name": "lisi",
"age": 16,
"gender": "女",
"address": "中国"
}
}
</script>
|
注意:由于 v-for优先级比 v-if 高,用在同1个元素上,一定会先执行数组遍历,然后再执行判断,出于性能的考虑,官方并不建议我们连用。
v-on
给页面元素绑定事件
简写 @
示例:
1
2
3
4
5
6
7
8
9
10
11
12
13
14
15
16
17
18
19
20
21
22
23
| <div id="app">
<h1 v-if="show">
<span style="color:green">show=true</span>
</h1>
<h1 v-else>
<span style="color:red">show=false</span>
</h1>
<button v-on:click="handleClick">点我</button>
</div>
<script>
const vm = new Vue({
el:"#app",
data:{
show:true
},
methods:{
handleClick:function(){
this.show=!this.show;
}
}
})
</script>
|
简写语法:
1
2
3
4
5
6
7
8
9
10
11
12
13
14
15
16
17
18
19
20
21
22
23
24
25
26
| <div id="app">
<h2>num={{num}}</h2>
<!-- 事件处理函数代码简单时,可以直接在事件绑定处写代码 -->
<button @click="num++">自增</button>
<button @click="decrement">自减</button>
</div>
<script>
const vm = new Vue({
el:"#app",
data:{
num:1
},
methods:{
increment(){
this.num--;
}
}
})
</script>
|
v-if
条件渲染(控制节点是否存在)
v-if 指令用于条件性地渲染一块内容。这块内容只会在指令的表达式返回 true 值的时候被渲染。
1
2
3
4
5
6
7
8
9
10
11
12
13
14
15
16
17
18
19
20
21
| <div id="app">
<h1 v-if="show">
<span style="color:green">show=true</span>
</h1>
<h1 v-if="!show">
<span style="color:red">show=false</span>
</h1>
<button onclick="handleClick()">点我</button>
</div>
<script>
const vm = new Vue({
el:"#app",
data:{
show:true
}
})
function handleClick(){
vm.show = !vm.show;
}
</script>
|
v-else
v-if后还可以添加v-else 指令来表示 v-if 的“else 块”,上面的示例还可以写出如下代码:
1
2
3
4
5
6
7
8
9
10
11
12
13
14
15
16
17
18
19
20
21
| <div id="app">
<h1 v-if="show">
<span style="color:green">show=true</span>
</h1>
<h1 v-else>
<span style="color:red">show=false</span>
</h1>
<button onclick="handleClick()">点我</button>
</div>
<script>
const vm = new Vue({
el:"#app",
data:{
show:true
}
})
function handleClick(){
vm.show = !vm.show;
}
</script>
|
v-show
条件渲染(控制节点是否隐藏)
1
2
3
4
5
6
7
8
9
10
11
12
13
14
15
16
17
18
19
20
21
| <div id="app">
<h1 v-show="show">
<span style="color:green">show=true</span>
</h1>
<h1 v-show="!show">
<span style="color:red">show=false</span>
</h1>
<button onclick="handleClick()">点我</button>
</div>
<script>
const vm = new Vue({
el:"#app",
data:{
show:true
}
})
function handleClick(){
vm.show = !vm.show;
}
</script>
|
v-if 和 v-show 的区别:
1
2
3
4
5
6
7
8
9
10
11
12
13
14
15
16
17
18
19
20
21
| ><div id="app">
<h1 v-if="show">
<span style="color:green">v-if指令</span>
</h1>
<h1 v-show="show">
<span style="color:green">v-show指令</span>
</h1>
<button onclick="handleClick()">点我</button>
></div>
><script>
const vm = new Vue({
el:"#app",
data:{
show:true
}
})
function handleClick(){
vm.show = !vm.show;
}
></script>
|
v-if 和 v-show 指令展示效果相同,但是打开开发者工具(F12或者ctrl+shift+i)查看Element面板,会发现2者的区别
v-if 是“真正”的条件渲染,因为它会确保在切换过程中条件块内的子组件适当地被销毁和重建。当初始条件为false时,其内部组件不会渲染。v-show 就简单得多,它在切换过程中,只是简单地基于 CSS 进行切换。当初始条件为false时,其内部组件也会预先渲染。
一般来说,v-if 有更高的切换开销,而 v-show 有更高的初始渲染开销。因此,如果需要非常频繁地切换,则使用 v-show 较好;如果在运行时条件很少改变,则使用 v-if 较好。
v-text
向指定节点渲染’文本’内容 会替换掉节点里原本的内容
1
| <div v-text="name">text</div>
|
v-html
比v-text多了html解析 有安全性问题
1
| <div v-html="name"><h1>html</h1></div>
|
v-cloak
特殊指令,vue接管容器后会自动删除v-cloak 可以配合css实现网速过慢时的 问题
1
| <div v-cloak >{{name}}</div>
|
v-once
只在初始化是渲染一次
1
2
| <div v-once>n的初始值:{{n}}</div>
<div >n的当前值:{{n}}</div>
|
v-pre
跳过vue的解析 加了以后不解析
1
| <div v-pre >n的当前值:{{n}}</div>
|
demo案例
1
2
3
4
5
6
7
8
9
10
11
12
13
14
15
16
17
18
19
20
21
22
23
24
25
26
27
28
29
30
31
32
33
34
35
36
37
38
39
40
41
42
43
44
| <body>
<div id="root">
<label>
<input type="text" v-model="value"/>
</label>
<button type="submit" @click="add">添加</button>
<ul>
<div v-for="item in list">
<li @click="del(item.key)">{{item.key}}-{{item.val}}</li>
</div>
</ul>
</div>
<script type="text/javascript">
Vue.config.productionTip=false;
let vue = new Vue({
el:"#root"
,data:function (){
return {
list:[]
,value:''
,index:0
}
}
,methods:{
add: function (){
if (!this.value) {
alert('请输入内容');
return;
}
this.list.push({key:this.index++,val:this.value});
this.value = '';
},
del:function (key){
this.list.forEach(function (item,index,arr){
if (item.key == key) {
arr.splice(index,1);
}
});
}
}
});
</script>
</body>
|
计算属性与监视属性
计算属性
对于任何复杂逻辑,都应当使用计算属性
示例:
1
2
3
4
| <div id="example">
<p>Original message: "{{ message }}"</p>
<p>Computed reversed message: "{{ reversedMessage }}"</p>
</div>
|
1
2
3
4
5
6
7
8
9
10
11
12
13
| var vm = new Vue({
el: '#example',
data: {
message: 'Hello'
},
computed: {
reversedMessage: function () {
return this.message.split('').reverse().join('')
}
}
})
|
监视属性
当需要在数据变化时执行异步或开销较大的操作时,这个方式是最有用的。
示例:
1
2
3
4
5
6
7
8
9
10
11
12
13
14
15
16
17
18
19
20
21
22
23
24
25
26
27
28
29
30
31
32
33
34
35
36
37
38
39
40
41
42
43
44
45
46
47
48
49
50
51
| <body>
<div id="root">
<h1>楼下的有一个{{info}}</h1>
<br/>
<button type="button" @click="next">切换</button>
</div>
<script type="text/javascript">
Vue.config.productionTip=false;
let vue = new Vue({
el:"#root"
,data:function (){
return {
animal: 0
}
}
,methods:{
next:function (){
this.animal++;
}
}
,computed:{
info:function (){
let info;
switch (this.animal){
case 0: info="小狗";
break;
case 1: info="小猫";
break;
case 2: info="小猪";
break;
case 3: info="小姐姐";
break;
default:
info="小怪兽";
this.animal=-1;
break;
}
return info;
}
}
,watch:{
info:{
handler (newVal,oldVal){
console.log(newVal,oldVal)
}
}
}
});
</script>
|
组件
组件的注册
组件的注册方式有2种:全局注册 和 局部注册
全局注册
全局注册的组件,可以在不同的Vue实例中使用。语法如下:
1
2
3
4
5
6
7
8
9
10
11
| <script>
Vue.component("组件名",{
template:"复用的html片段",
data:function(){
return {...}
},
methods:{
}
})
</script>
|
局部注册
一旦全局注册,就意味着即便以后你不再使用这个组件,它依然会随着Vue的加载而加载。因此,对于一些并不频繁使用的组件,我们会采用局部注册。在Vue实例中添加选项 components 语法如下:
1
2
3
4
5
6
7
8
9
10
11
12
13
14
15
16
17
18
19
20
| <script>
const vm = new Vue({
el:"选择器",
data:{
},
components:{
"组件名":{
template:"复用的html片段",
data:function(){
return {...}
},
methods:{
}
}
}
});
</script>
|
示例:
1
2
3
4
5
6
7
8
9
10
11
12
13
14
15
16
17
18
19
20
21
22
23
24
25
| <div id="app">
<button-counter></button-counter>
<button-counter></button-counter>
</div>
<script>
const vm = new Vue({
el:"#app",
components:{
"button-counter":{
template:"<button @click='increment'>你点了我{{count}}次,我记住了</button>",
data:function(){
return {
count:0
}
},
methods:{
increment(){
this.count++;
}
}
}
}
})
</script>
|
注册优化
当Vue实例中注册的组件比较多时,Vue实例的代码就会变得非常臃肿,不利于代码管理,此时可以将Vue实例参数抽取成变量。
1
2
3
4
5
6
7
8
9
10
11
12
13
14
15
16
17
18
19
20
21
22
23
| <script>
const buttonCounter = {
template:"<button @click='increment'>你点了我{{count}}次,我记住了</button>",
data:function(){
return {
count:0
}
},
methods:{
increment(){
this.count++;
}
}
};
const vm = new Vue({
el:"#app",
components:{
"button-counter":buttonCounter
}
})
</script>
|
说明:组件注册时,如果组件名和组件变量名同名,还可以简写:
components:{
buttonCounter:buttonCounter
}
// ==> 直接只写一个 buttonCounter即可
components:{
buttonCounter
}
将html片段抽取到template标签中
当template中的html片段比较复杂时,在组件参数中直接定义html片段非常麻烦,此时可以将html片段抽取到特殊的template标签中。
1
2
3
4
5
6
7
8
9
10
11
12
13
14
15
16
17
18
19
20
21
22
23
24
25
26
27
| <template id="bc">
<button @click='increment'>你点了我{{count}}次,我记住了</button>
</template>
<script>
const buttonCounter = {
template:"#bc",
data:function(){
return {
count:0
}
},
methods:{
increment(){
this.count++;
}
}
};
const vm = new Vue({
el:"#app",
components:{
"button-counter":buttonCounter
}
})
</script>
|
组件和is属性(了解)
在html标签中使用组件时,受到 HTML 本身的一些限制。比如table、ul、select内部只能出现特定的子标签,如果在这些标签中使用组件,组件无法正确显示。解决方案:使用is属性
1
2
3
4
5
6
7
8
9
10
11
12
13
14
15
16
17
18
19
20
21
22
23
24
25
26
27
28
29
30
31
32
33
34
35
36
37
38
39
40
41
42
43
44
45
46
47
48
49
50
51
52
53
54
55
56
57
58
59
60
61
| <div id="app">
<h4>直接在table中使用table-body组件</h4>
<table border="1">
<thead>
<tr>
<th>id</th>
<th>name</th>
<th>age</th>
<th>gender</th>
</tr>
</thead>
<table-body></table-body>
</table>
<h4>在table中通过is属性使用table-body组件</h4>
<table border="1">
<thead>
<tr>
<th>id</th>
<th>name</th>
<th>age</th>
<th>gender</th>
</tr>
</thead>
<tbody is="table-body"></tbody>
</table>
</div>
<template id="table-body">
<tbody>
<tr v-for="u in users" :key="u.id">
<td>{{u.id}}</td>
<td>{{u.name}}</td>
<td>{{u.age}}</td>
<td>{{u.gender}}</td>
</tr>
</tbody>
</template>
<script>
const tableBody = {
template:"#table-body",
data(){
return {
users: [
{"id":1, "name": "小明", "age": 13, "gender": "男"},
{"id":2, "name": "小红", "age": 13, "gender": "女"},
{"id":3, "name": "小绿", "age": 4, "gender": "男"}
]
}
}
}
const vm = new Vue({
el:"#app",
components:{
"table-body":tableBody
}
})
</script>
|
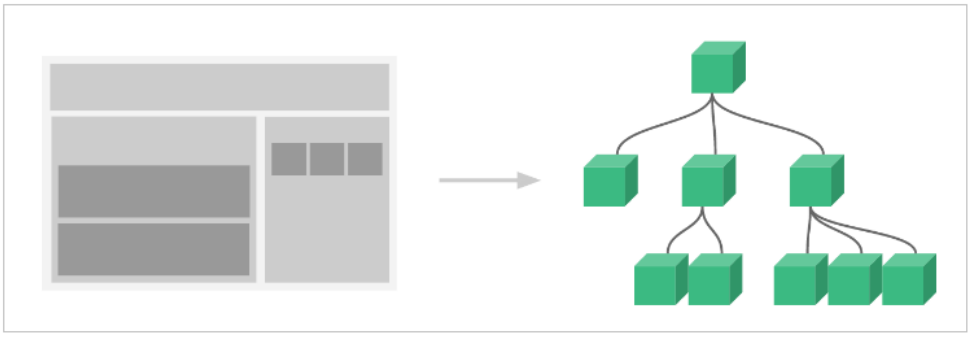
组件嵌套
在Vue的设计中,一切都可以看作组件。整个页面可以看作是一个根组件,内部的各块组件可以看作子组件。组件之间自然的会发生嵌套关系
示例:
1
2
3
4
5
6
7
8
9
10
11
12
13
14
15
16
17
18
19
20
21
22
23
24
25
26
27
28
29
30
31
32
33
34
35
36
37
38
39
40
41
42
43
44
45
46
47
48
49
50
51
52
53
54
55
56
57
58
59
60
61
62
63
64
65
| <div id="app">
<my-table></my-table>
</div>
<template id="table-head">
<thead>
<tr>
<th>id</th>
<th>name</th>
<th>age</th>
<th>gender</th>
</tr>
</thead>
</template>
<template id="table-body">
<tbody>
<tr v-for="u in users" :key="u.id">
<td>{{u.id}}</td>
<td>{{u.name}}</td>
<td>{{u.age}}</td>
<td>{{u.gender}}</td>
</tr>
</tbody>
</template>
<template id="my-table">
<table border="1" align="center">
<thead is="table-head"></thead>
<tbody is="table-body"></tbody>
</table>
</template>
<script>
var tableHead = {
template:"#table-head"
}
var tableBody = {
template:"#table-body",
data:function(){
return {
users: [
{"id":1, "name": "小明", "age": 13, "gender": "男"},
{"id":2, "name": "小红", "age": 13, "gender": "女"},
{"id":3, "name": "小绿", "age": 4, "gender": "男"}
]
}
}
}
var myTable ={
template:"#my-table",
components:{
"table-head":tableHead,
"table-body":tableBody
}
}
const vm = new Vue({
el:"#app",
components:{
"my-table":myTable
}
});
</script>
|
事实上,虽然 new Vue() 没有显式的使用组件的语法,但它本质上也是一个父组件。
组件通信
父传子:props
通常父组件的模板中包含子组件,父组件要正向地向子组件传递数据或参数,子组件接收到后根据参数的不同来渲染不同的内容或执行操作。这个正向传递数据的过程就是通过props来实现的。
比如在之前的表格案例中,table-body子组件展示的数据是定义在子组件自个身上的,这么做虽有效果,但降低了该组件的复用价值,更好的做法:子组件中不定义数据,而是由使用它的父组件传递。此时,需要使用 props完成父组件向子组件的数据传递。
1
2
3
4
5
6
7
8
9
| 语法:
//1.定义子组件中添加props属性
const 组件 = {
template:"html片段",
props:["自定义参数名",...]
}
//2 使用组件时,为组件添加 自定义参数名 同名的属性
<组件 :自定义参数名=”值"></组件>
|
示例:
1
2
3
4
5
6
7
8
9
10
11
12
13
14
15
16
17
18
19
20
21
22
23
24
25
26
27
28
29
30
31
32
33
34
35
36
37
38
39
40
41
42
43
44
45
46
47
48
| <div id="app">
<my-table :us="users"></my-table>
</div>
<template id="my-table">
<table border="1" align="center">
<thead>
<tr>
<th>id</th>
<th>name</th>
<th>age</th>
<th>gender</th>
</tr>
</thead>
<tbody>
<tr v-for="u in us" :key="u.id">
<td>{{u.id}}</td>
<td>{{u.name}}</td>
<td>{{u.age}}</td>
<td>{{u.gender}}</td>
</tr>
</tbody>
</table>
</template>
<script>
var myTable = {
template:"#my-table",
props:["us"]
}
const vm = new Vue({
el:"#app",
data:{
users: [
{"id":1, "name": "小明", "age": 13, "gender": "男"},
{"id":2, "name": "小红", "age": 13, "gender": "女"},
{"id":3, "name": "小绿", "age": 4, "gender": "男"}
]
},
components:{
"myTable":myTable
}
});
</script>
|
子传父:$emit
父组件的模板中包含子组件,那么经常会出现子组件的状态发生变化时,要通知到父组件。所有的 prop 都使得其父子 prop 之间形成了一个单向下行绑定:父级 prop 的更新会向下流动到子组件中,但是反过来则不行。如下所示:
1
2
3
4
5
6
7
8
9
10
11
12
13
14
15
16
17
18
19
20
21
22
23
24
25
26
27
28
29
30
31
32
33
34
35
| <div id="app">
<h2>{{num}}</h2>
<counter :count="num"></counter>
</div>
<script>
Vue.component("counter",{
template:`
<div>
<button @click="increment">点我自增</button>
<span>{{count}}</span>
<button @click="decrement">点我自减</button>
</div>`,
props:["count"],
methods:{
increment(){
this.count++;
},
decrement(){
this.count--;
}
}
})
const vm = new Vue({
el:"#app",
data:{
num:0
}
})
</script>
|
所以,当需要子传父的时候,Vue采用事件放射的方式完成。
- 在子组件中执行 $emit(“父组件的自定义事件”)通知父组件,并发送数据
- 父组件中定义自定义事件处理函数,并接收数据
1
2
3
4
5
6
7
8
9
10
11
12
13
14
15
16
17
18
19
20
21
22
23
24
25
26
27
28
29
30
31
32
33
34
35
36
37
38
39
40
41
42
43
44
| <div id="app">
<h2>{{num}}</h2>
<counter :count="num" @change-count="handleChange"></counter>
</div>
<script>
Vue.component("counter",{
template:`
<div>
<button @click="increment">点我自增</button>
<span>{{count}}</span>
<button @click="decrement">点我自减</button>
</div>`,
props:["count"],
methods:{
increment(){
this.count++;
this.$emit("change-count",this.count);
},
decrement(){
this.count--;
this.$emit("change-count",this.count);
}
}
})
const vm = new Vue({
el:"#app",
data:{
num:0
},
methods:{
handleChange(value){
this.num = value;
}
}
})
</script>
|
VueRouter
什么是路由(这里不要死抠字眼,尝试从字面上理解,只是一个名词而已,重点是理解名词代表的技术解决什么问题)?生活中最能体现路由功能的是路由器,路由器的作用:互联网中的计算机,必须要通过路由器根据目标机器ip地址,将数据转发到目标机器。
路由示例
页面引入 vue-router.js
1
2
3
| <script type="text/javascript" src="js/vue-2.6.12.js"></script>
<script type="text/javascript" src="js/vue-router-3.4.9.js"></script>
|
定义组件
1
2
3
4
5
6
| const loginForm = {
template:"#login-form"
}
const registerForm = {
template:"#register-form"
}
|
创建 VueRouter对象,配置路由匹配规则
1
2
3
4
5
6
7
8
9
10
11
|
var router = new VueRouter({
routes:[
{
name:"login",
path:"/login",
component:loginForm
},
{name:"register",path:"/register",component:registerForm}
]
});
|
向Vue实例中配置router
1
2
3
4
5
| const vm = new Vue({
el:"#app",
router
})
|
在页面上使用路由
1
2
3
4
5
6
7
8
| <div id="app">
<a href="#/login">登录</a>
<a href="#/register">注册</a>
<hr>
<router-view></router-view>
</div>
|
router-link和redirect
router-link
router-link标签用于代替a标签,定义跳转超链接
1
2
3
4
5
6
7
8
9
10
11
| <div id="app">
<router-link to="/login">登录</router-link>
<router-link to="/register">注册</router-link>
<hr>
<router-view></router-view>
</div>
|
redirect
redirect属性用在路由上,比如在a路由上配置redirect:b路由的路径,当访问a时会自动重定向到b。通常用于配置页面的默认路由地址
1
2
3
4
5
6
7
8
9
10
11
| var router = new VueRouter({
routes:[
{name:"default",path:"/",redirect:"/login"},
{
name:"login",
path:"/login",
component:loginForm
},
{name:"register",path:"/register",component:registerForm}
]
});
|
嵌套路由
实际生活中的应用界面,通常由多层嵌套的组件组合而成。当我们路由到某一个组件后,还经常需要在该组件中继续路由到其子组件,这就需要使用Vue的嵌套路由。比如:当我们路由到登录组件后,又分为手机验证码登录和 账户名密码登录 2个子组件。
1
2
3
4
5
6
7
8
9
10
11
12
13
14
15
16
17
18
19
20
21
22
23
24
25
26
| 语法:
const 子组件 = {
template:"子组件标签"
}
const 父组件 = {
tempalate:`
<router-link to="/父组件路径/子组件的路径">链接1</router-link>
<router-view></router-view>
`
}
const router = new VueRouter({
routes:[
{
path:"/组件路径",
component:父组件对象,
children:[
{
path:"子组件路径",
component:子组件
}
]
}
]
})
|
示例:
1
2
3
4
5
6
7
8
9
10
11
12
13
14
15
16
17
18
19
20
21
22
23
24
25
26
27
28
29
30
31
32
33
34
35
36
37
38
39
40
41
42
43
44
45
46
47
48
49
50
51
52
53
54
55
56
57
58
59
60
61
62
63
64
65
66
67
68
69
70
71
72
73
74
| <body>
<div id="app">
<router-link to="/login">登录</router-link>
<router-link to="/register">注册</router-link>
<hr>
<router-view></router-view>
</div>
<template id="phone-login-form">
<form action="">
手机号: <input type="number" name="phone" > <br>
验证码: <input type="password" name="code"> <br>
<input type="submit" value="登录">
</form>
</template>
<template id="account-login-form">
<form action="">
用户名: <input type="text" name="username" > <br>
密码: <input type="password" name="pwd"> <br>
<input type="submit" value="登录">
</form>
</template>
<template id="register-form">
<form action="">
用户名: <input type="text" name="username" > <br>
密码: <input type="password" name="pwd1"> <br>
确认密码: <input type="password" name="pwd2" > <br>
<input type="submit" value="注册">
</form>
</template>
<script>
const registerForm = {
template:"#register-form"
}
const phoneLogin = {
template:"#phone-login-form"
}
const accountLogin = {
template:"#account-login-form"
}
const loginForm = {
template:`
<div>
<router-link to="/login/phone">手机验证码登录</router-link>
<router-link to="/login/account">用户名密码登录</router-link> <br> <br>
<router-view></router-view>
</div>
`
}
const router = new VueRouter({
routes:[
{path:"/",redirect:"/register"},
{path:"/register",component:registerForm},
{
path:"/login",
component:loginForm,
children:[
{path:"phone",component:phoneLogin},
{path:"account",component:accountLogin}
]
}
]
})
const vm = new Vue({
el:"#app",
router
})
</script>
</body>
|
路由组件传参
通过路由导航到组件时,有时需要传递参数。
query传参
1
2
3
4
5
6
7
8
9
10
11
12
13
14
15
16
17
18
19
20
21
22
23
24
| <div id="app">
<router-link to="/user?name=李栓蛋&age=38">用户管理</router-link>
<router-link :to="{path:'/user',query:{name:'王花花',age:28}}">用户管理</router-link>
<router-view></router-view>
</div>
<script>
const user = {
template:`<div>
<div>我叫{{$route.query.name}}</div>
<div>今年{{$route.query.age}}</div>
</div>`
}
const router = new VueRouter({
routes:[
{path:"/user",component:user}
]
})
const vm = new Vue({
el:"#app",
router
})
</script>
|
params传参
1
2
3
4
5
6
7
8
9
10
11
12
13
14
15
16
17
18
19
20
21
22
| <div id="app">
<router-link to="/product/macbookair">商品1</router-link>
<router-link :to="{name:'product',params:{name:'macbookpro'}}">商品2</router-link> <router-view></router-view>
</div>
<script>
const product = {
template:`<div>
<div>商品名:{{$route.params.name}}</div>
</div>`
}
const router = new VueRouter({
routes:[
{name:"product",path:"/product/:name",component:product}
]
})
const vm = new Vue({
el:"#app",
router
})
</script>
|
编程式的路由导航
除了使用 <router-link> 创建 a 标签来定义导航链接,我们还可以借助 router 的实例方法,通过编写代码来实现。
1
| 语法:router.push(location, onComplete?, onAbort?)
|
注意:在 Vue 实例内部,你可以通过 $router 访问路由实例。因此你可以调用 this.$router.push。
| 声明式 |
编程式 |
<router-link :to="..."> |
router.push(...) |
该方法的参数可以是一个字符串路径,或者一个描述地址的对象。例如:
1
2
3
4
5
6
7
8
|
router.push('/login')
router.push({ path: '/login' })
router.push({ path: 'register', query: { plan: 'private' }})
|
示例:在注册后,立刻导航到登录
1
2
3
4
5
6
7
8
9
10
11
12
13
14
15
16
17
18
19
20
21
22
23
24
25
26
27
28
29
30
31
32
33
34
35
36
37
38
39
40
41
42
43
44
45
46
47
48
49
50
51
52
53
54
55
56
57
| <div id="app">
<router-link to="/login">登录</router-link>
<router-link to="/register">注册</router-link>
<hr>
<router-view></router-view>
</div>
<template id="login-form">
<form action="">
用户名: <input type="text" name="username" > <br>
密码: <input type="password" name="pwd"> <br>
<input type="submit" value="登录">
</form>
</template>
<template id="register-form">
<form action="" @submit.prevent="handleRegister">
用户名: <input type="text" name="username" > <br>
密码: <input type="password" name="pwd1"> <br>
确认密码: <input type="password" name="pwd2" > <br>
<input type="submit" value="注册">
</form>
</template>
<script>
const loginForm = {
template:"#login-form"
}
const registerForm = {
template:"#register-form",
methods:{
handleRegister(){
alert("添加成功");
this.$router.push({path:"/login"})
}
}
}
var router = new VueRouter({
routes:[
{name:"default",path:"/",redirect:"/login"},
{
name:"login",
path:"/login",
component:loginForm
},
{name:"register",path:"/register",component:registerForm}
]
});
const vm = new Vue({
el:"#app",
components:{
loginForm,
registerForm
},
router
})
</script>
|
Vue的生命周期
每个 Vue 实例在被创建时都要经过一系列的初始化过程 :创建实例,装载模板,渲染模板、销毁等。Vue为生命周期中的每个状态都设置了钩子函数(监听函数)。当Vue实例处于不同的生命周期时,对应的函数就会被触发调用。
生命周期图示
下图展示了实例的生命周期。你不需要立马弄明白所有的东西,不过随着你的不断学习和使用,它的参考价值会越来越高。
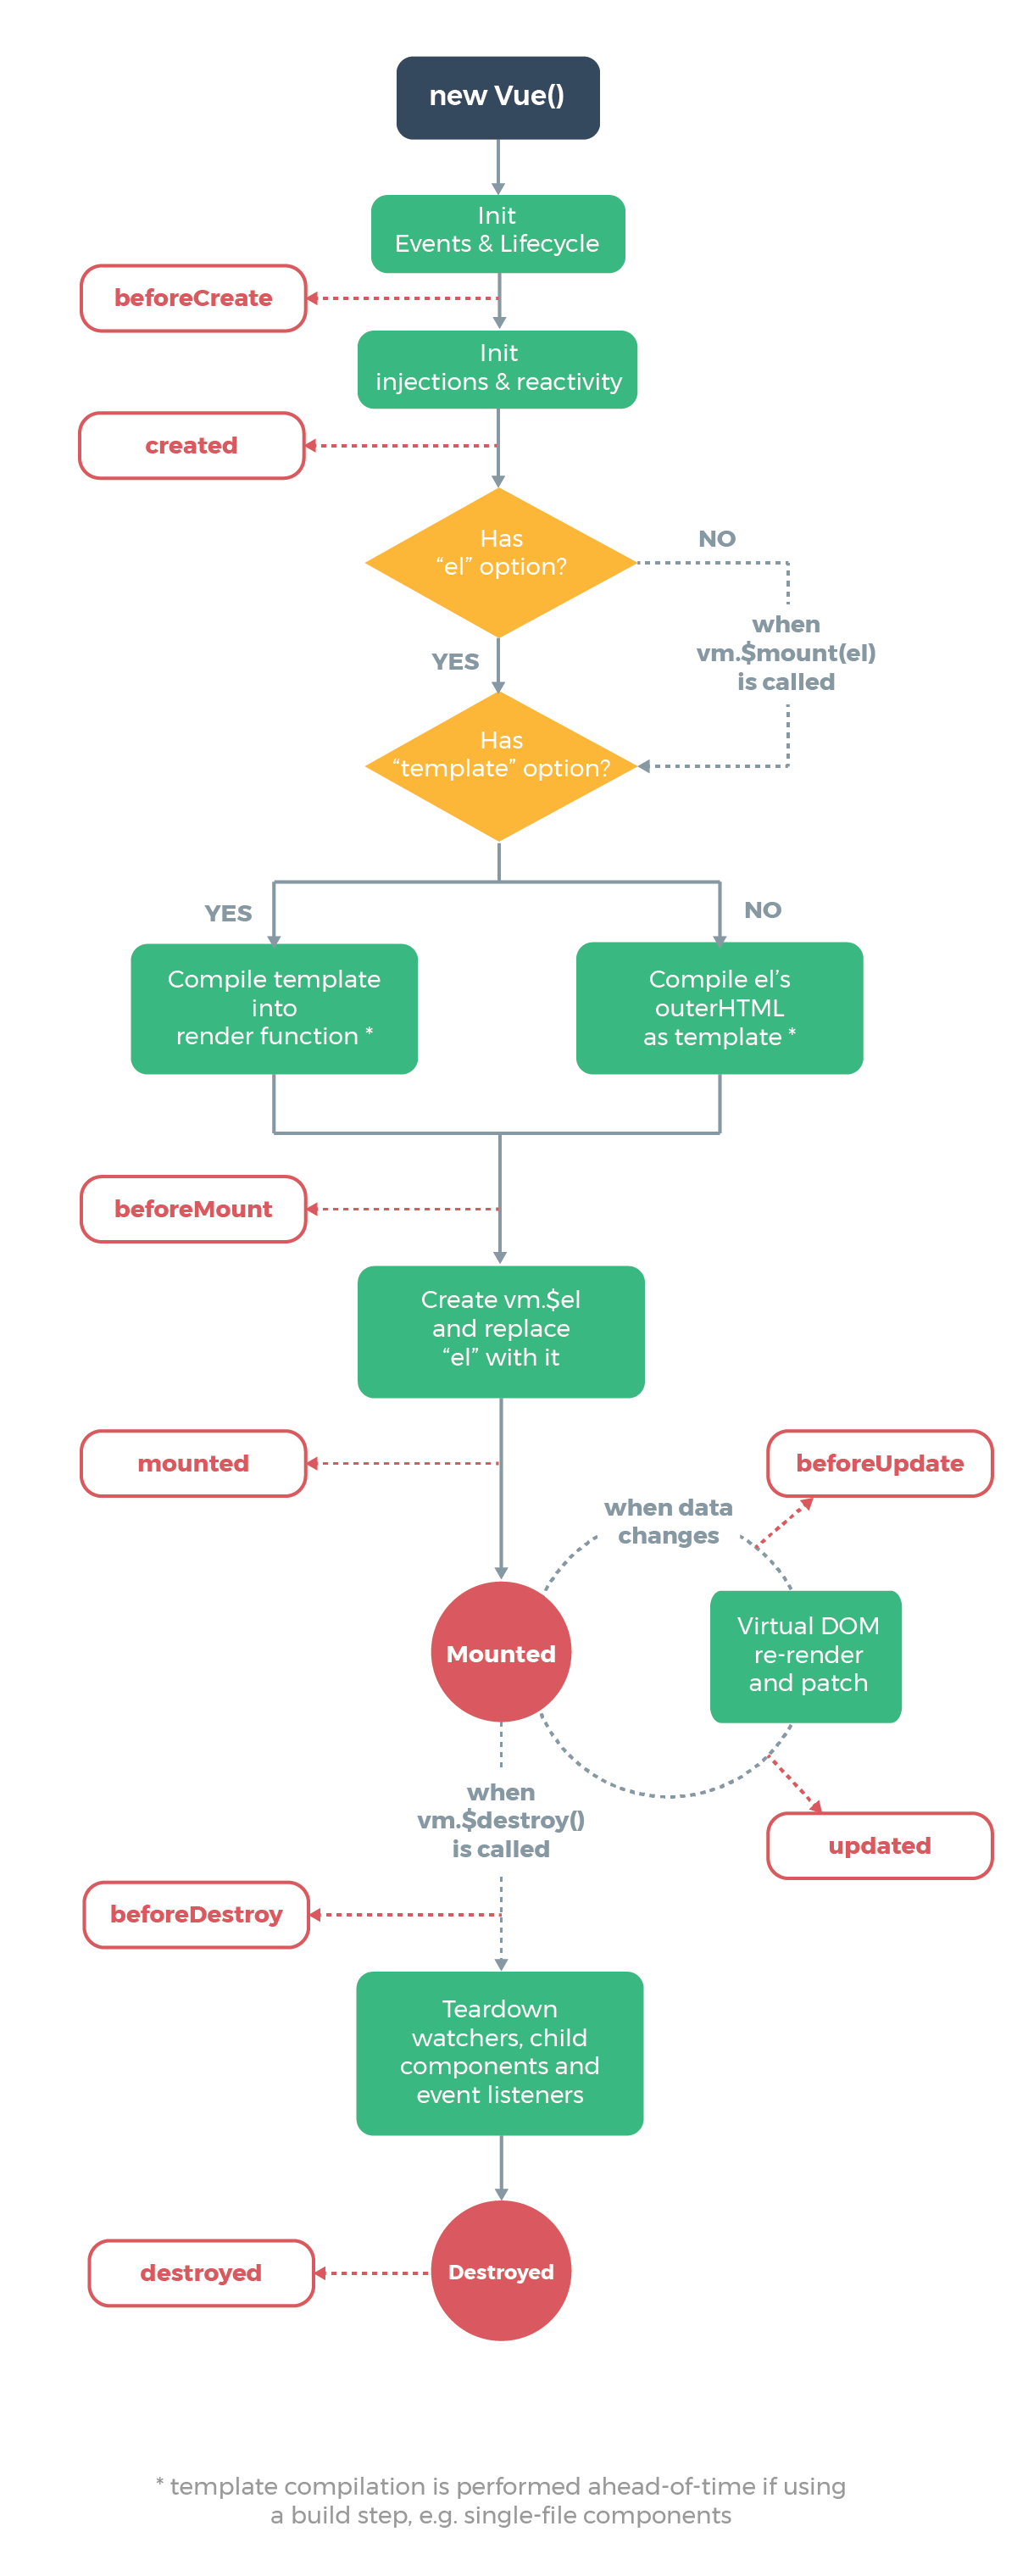
钩子函数
每个 Vue 实例在被创建时都要经过一系列的初始化过程。同时在这个过程中也会运行一些叫做生命周期钩子的函数,这些函数在生命周期的不同阶段自动触发执行,这给了用户在不同阶段添加自己的代码的机会。
| 生命周期钩子 |
含义 |
| beforeCreate(vue对象创建前) |
组件实例刚被创建,组件属性计算之前,此时不能访问属性 |
| created(创建后) |
组件实例创建完,属性可以访问,但是还不能通过 $el 访问DOM |
| beforeMount(加载前) |
模板编译、挂载之前,可以通过 $el 访问渲染前的DOM |
| mounted(载入后) |
模板编译、挂载之后,可以通过 $el访问渲染前的DOM |
| beforeUpdate(更新前) |
组件更新之前,可以获取组件更新前的DOM |
| updated(更新后) |
组件更新之后,可以获取组件更新后的DOM |
| beforeDestroy(销毁前) |
组件销毁前调用 |
| destroyed(销毁后) |
组件销毁后调用 |
通过以下案例,演示下各个钩子函数的使用:
1
2
3
4
5
6
7
8
9
10
11
12
13
14
15
16
17
18
19
20
21
22
23
24
25
26
27
28
29
30
31
32
33
34
35
36
37
38
39
40
41
42
43
44
45
46
47
48
49
50
51
52
53
54
55
56
57
58
59
60
61
62
63
64
65
66
| <div id="app">
<h1>{{msg}}</h1>
<button @click="changeMsg">点我修改msg</button>
</div>
<script>
const vm = new Vue({
el:"#app",
data:{
msg:"hell vue"
},
methods:{
changeMsg(){
this.msg = "hello baizhi";
}
},
beforeCreate:function(){
console.log("beforeCreate...");
console.log(this.$el);
console.log(this.msg);
},
created:function(){
console.log("created...");
console.log(this.$el);
console.log(this.msg);
},
beforeMount:function(){
console.log("beforeMount...");
console.log(this.$el);
console.log(this.msg);
},
mounted:function(){
console.log("mounted...");
console.log(this.$el);
console.log(this.msg);
},
beforeUpdate:function(){
console.log("beforeUpdated...");
console.log(this.$el.innerHTML);
console.log(this.msg);
},
updated:function(){
console.log("updated...");
console.log(this.$el.innerHTML);
console.log(this.msg);
},
beforeDestroy:function(){
console.log("beforeDestroy...");
console.log(this.$el);
console.log(this.msg);
},
destroyed:function(){
console.log("destroyed...");
console.log(this.$el);
console.log(this.msg);
}
})
</script>
|
一般地,我们会在 created 钩子函数中,从服务端获取数据,并对数据进行初始化。